Thursday, November 30, 2017

Texas Two-Step Potatoes

I made myself some Texas Two-Step Potatoes today.  I love them.  They can be reheated for more than one meal so they are handy to make.

INGREDIENTS:
5-6 Potatoes, partially skinned and sliced.
oil for the skillet
chopped garlic for the skillet
Roasted Garlic and Herb Seasoning
All-Season Salt
Dried Thyme
Salt and Pepper, to taste
1/4 cup Cold Water

Heat a large skillet, adding veggie oil to heat.
Note:   I named these Texas 2-Step because of two things, the skillet I use is Texas-sized and the popular Texas dance step of the same name is apropos for these potatoes.
The Two Steps happens when you originally brown them in the skillet and then the final steaming of them to soften them at the end.

Scrub your potatoes so the skin is clean.  Slice off the 2 ends and trim away some of the peelings from the 4 sides.  I leave some on, but not much.  Then cut the taters in half lengthwise first, then slice them across about a quarter inch or less wide.  Add them to the heated skillet on med. high heat.

Add to the taters, the Roasted Garlic Herb Seasoning, All-Season Salt, Thyme, salt and pepper.
Stir and coat the taters with the oil.
Above are the seasonings I use, but you can use what you like best.  Sometimes I add a little Crushed Red Pepper if I want a little extra heat.

On medium-high heat, cook the potatoes for about 15 minutes, turning occasionally so they do not burn.  When the taters test almost tender, its time for the steaming process.

Push the taters aside and add 1/4 Cup of water to the center of the skillet and cover.  Turn the heat up to high for a minute or two to get the water starting to steam, then back down to med. high to cook.

In about 5 mins. the steam will have permeated the taters and softened them nicely.  No hard taters here.  Check your potatoes and turn them as they grow tender.


I find that cooking frozen sausage (above) with the taters is a two-for-one, making a complete meal.  The frozen sausage calls for water in the skillet and covering them for 3 minutes while they cook.

I turn them over and continue to cook the sausage til they have browned, as you can see in the photo below.


If you want a breakfast-for-supper meal, add a couple of eggs to the skillet when you remove the sausage and taters.  Finish them up and serve a complete meal.  In the photo above, I skipped the eggs this time.

You can keep these taters in a covered bowl in your fridge and add them to meals, reheated in the microwave, for 3 or 4 days hence so make a lot if you plan on having more taters with meals.

The first time I made these, my family really enjoyed them.  They were a first and very tasty.  Now they are always in a menu item of mine now and then.  Enjoy.

Have a Good Day.

Tuesday, November 28, 2017

Hanging Dish Towel Instructions

Some have asked that I post the instructions for the towels I've been making.  I took some pix a few months back when I was making Halloween towels, so I will post a few of those, too, to make my points clearer for those that like photos to help get a point across.

MATERIALS:

ONE KITCHEN DISH TOWEL, CUT IN HALF.
WORSTED-WEIGHT YARN.
CROCHET HOOK G OR H.
AWL OR SHARP-POINTED SCISSORS TO PUNCH/CUT HOLES IN THE TOWEL.
2 BUTTONS TO FIT (3/4", 7/8" OR ONE-INCH WILL WORK).  YARN STRETCHES TO FIT.
THREAD TO MATCH YARN FOR SEWING ON THE BUTTONS.

PATTERN:

PUNCH 41 HOLES ACROSS THE CUT-SECTION OF THE DISH TOWEL, KEEPING THEM EVENLY SPACED.

ROW 1:  SINGLE CROCHET (SC) ACROSS. (YOU SHOULD HAVE 41 STITCHES (STS) ACROSS, CH 1, TURN.

ROW 2:  SC ACROSS (41 STS), CH 2, TURN.

ROW 3:  DOUBLE CROCHET (DC) ACROSS. YOU SHOULD HAVE 41 STS ACROSS COUNTING THE 1st CH 2 WHEN TURNING).  CH 2, TURN.

ROW 4: DC ACROSS, (YOU SHOULD HAVE 41 STS ACROSS), CH 3, TURN.

ROW 5.  TREBLE CROCHET (TR) IN FIRST SPACE.  *SKIP 1 SPACE, TC 1, REPEAT FROM * ACROSS.  (YOU SHOULD HAVE 22 STS ACROSS COUNTING THE 1ST CH 3).  CH 3, TURN.
NOTE;  FOR THE TR ROWS YOU ARE STITCHING IN THE SPACES BETWEEN THE STITCHES, NOT IN THE STITCHES THEMSELVES.

ROW 6:  TC IN 3RD SPACE, REPEATING THE SAME ACROSS AS 5TH ROW.  (YOU SHOULD HAVE 11 STS ACROSS COUNTING THE 1ST CH 3).  CH 2, TURN.

THE MOST IMPORTANT FACTOR IS TO HAVE THE CORRECT NUMBER OF STITCHES ACROSS.  IF YOU NEED TO TWEAK AT THE END OF A ROW, DO SO.

ROW 7:  DC ACROSS.  ( YOU WILL NOW BE WORKING WITH 11 STS ACROSS EVERY ROW).  CH 2, TURN.

REPEAT ROW 7 THRU ROW 15.  (YOU WANT 9 ROWS OF DOUBLE CROCHET FOR THE HANGING STRIP).

ROW 16:  DC ACROSS 5 STS, SKIP 1 STITCH (FOR BUTTON HOLE), DC IN THE LAST 5 STS.  CH 1, TURN.

ROW 17.  SC SCROSS, ENDING WITH FASTENING OFF AND CUT.  WEAVE THE TAIL THRU SOME OF THE STITCHES SO THEY DISAPPEAR.

SEW BUTTON IN CENTER OF ROW 8.

A FEW TIPS:


I use binder clips to section off for every 5 stitches.  I tried pins but they slipped out too easily and also nicked my fingers.  Binder clips don't slide.
You can fold towel in half and clip mark every 5 stitches for the first 20 stitches, then do the other half.

An embroidery scissors makes great cuts in the towels with their fine points.  I only cut 5 stitches at a time, then single crochet them, then do the next 5 to keep them even.

The chain 2 or 3 at the end of each row is always counted as the first ST of the next row.  The 2nd ST is taken in the very next stitch you can see from where I'm pointing with my pencil.

For the TREBLE CROCHET rows, you work in the SPACES, not the stitches themselves.  At the end of the first row of TC, you should have 22 stitches.  If you need to, tweak to get that number.

For the 2nd TC ROW, you will TC IN THE 3RD SPACE as noted in the photo above.

The hanging strip of crochet should be 11 stitches across.  You want to end up with 9 rows of the 11 DC across.  For the next (10th) row, you skip one ST in the center for the buttonhole.  Sew the button to the middle crochet stitch on the 2nd row of the band.

A finished pair from one dish towel shown above.

I hope my pix and notes make it clearer for those needing that info.  I know it always helps me to have something to see when I'm learning something new.

Good luck and have fun making up these towels for gifts and for yourself.  Every Holiday thru the year can be noted with scene-appropriate towels so enjoy them.

Have a good day.


Friday, November 24, 2017

Happy Thanksgiving!

I hope you all had a nice Thanksgiving Day.  We did in my family.
My son roasted a large turkey that was delicious, it was so moist and flavorful.
I made Lithuanian bundies, mashed taters with gravy and peanut butter balls.  I brought a bakery pie and some store-bought things along.  Everything was A-1 in my book.  Everyone had seconds of everything.

Streets on the way to the City were pretty much deserted as were the parking lots.

Today was a lazy day for me.  I vacuumed because it was needed and this morning I also washed the dishes and pots I used on T-Day for the food I brought, but that was the limit of my endeavors.  I was lazy and tired when I got home yesterday after eating so well so nothing got done and I even took a couple of naps on the sofa in front of the TV.

Its been chilly every day lately, in the 30s, but at least its been sunny for the Holiday and today.
The river is high and the rapids are rolling.  There must be some rain from further up north because our boulders in the river have disappeared under the height of the river.

Lately in the mornings the grass is frosted over early but it disappears when the sun has been out a few hours.
Gardens are pretty bleak but our Pampas grass is lovely and waving their plumes over 7 feet high.

I don't shop on Black Friday since several years ago when I tried it once and didn't like it.  The ads for specific things were limited to only a few so no more available for everyone that wanted one.  A wasted trip to the stores, forme.  I thought it was a lost cause trekking around the stores trying to get things on my list.  Now I shop some online and the rest during other times during the year.  No Black Friday shopping ever again for me.

Have a good day.

Monday, November 13, 2017

I Made More Hanging Dish Towels.

I've got a deadline which is Turkey Day so I have been crocheting more oven door hanging towels.

Here are just a couple of them.  I bring several pairs with me to Turkey Dinner to give to the other guests as their pre-Xmas décor gift for this season.  Most folks like getting them.  They are very useful and they are cute as well.

I can't believe it folks, we are getting snow.  Its the first snow of the season here in southwestern Maine.  I just don't want to see it this early.  Our winters last much too long as it is with Dec., Jan, Feb, and into March for sure.  They told us rain today, not snow.  What other job in the world can you be wrong so often and still keep your cushy and well-paid position.   It must be great to know that no matter how many times you get it wrong,  you are safe in your job.

Have a Good Day.

Friday, November 10, 2017

"Iris in Season" WH is Completed

I started this quite some time ago, many months in fact.  I just finished it today.
This measures 20.5 by 26.5 inches.  In the lower right in the picture you can see my corgi, Penny, lying on her blanket keeping watch.

Here's a closer view of Iris in Season.

Now with my slate clean, I can begin my Xmas and Winter Wall Hangings.  I have some rather cute ones drawn out which I can begin this weekend.  I am also crocheting Xmas hanging dish towels for T-Day gifts when I go to dinner.

Have a nice Day.

Thursday, November 9, 2017

Guardian Goat Gargoyle Comes to My House

In checking my ancestry, I learned that gargoyles were placed on Lithuanian housetops to guard homes from evil.  Their scary features were meant to scare away any evil creatures coming to do harm in a home.  Being of Lithuanian descent, they are part of my history.

My Father came to America from Lithuania in the early 1900s and served in the U.S. Army, earning a medal at the Second Battle of the Marne.  His brother and sister also emigrated from Lithuania.  My Mother was born in America, but both her parents came from Lithuania as well.  So you see, gargoyles are in my past on both sides of my family.  Also amber in a unique gemstone from my ancestry and I will be looking to add that to my ancestral collection soon.

For now, meet my latest acquisition.  He's a cast iron, winged, half man, half goat, Guardian Goat Gargoyle.
I named him Gamma Ramma, my guardian goat against evil.  He sits in my window since I have no way of putting him on my rooftop, but he can look out into the world and protect me from evil doers from his post.  I think he's rather handsome.  I also like goats in general, so I'm happy to add him to my household.

Its a cold evening here in Maine.  I will be sitting, cozy and warm, with cotton dish towels on my lap and crocheting happily tonite making inroads in my stash of Holiday gifts.

Have a Nice Evening.

I Finished Two Turkey Wall Hangings

Its nice to have these finished.
This Wall Hanging, Turkey Duo, measures 13 by 15 inches.  Just right for my front door.

This one, Turkey in Colors, measures 13.5 by 15 inches and will share space on the front door in between the others.  I think a week at a time is sufficient for each of them.

Tho I have another floral one ready to layer, pin, and quilt and bind, I will not finish it today.  I am also deciding which pattern I want to use for my Xmas wall hangings.  I keep changing my mind.  I have so many of them drawn out and no time for them all this year.

I shopped yesterday and bought over half a dozen more dish towels, these in Xmas scenes, so I will be working on those to get ready for T-Day when I will give them out to those that share the T-Day dinner so they can use them up to and including Xmas Day this year.

Its a cold one today, only in the low 40s today with the nites being below freezing now.  Brrrrr, winter is right around the corner for us this year, I think.

Have a good day.

Monday, November 6, 2017

I Worked On Wall Hangings Today

I finished Turkey in the Marigolds on Oct 19th but didn't care for the eye so I bought some wiggly eyes and added one.  He's much cuter.
The eye makes him more alive.   This one is 13.5 by 14.5 inches finished.

I also worked on my two other turkey wall hangings.
I finished the satin-stitching around my Turkey Duo today.  I will add wiggly eyes to these as well.

This one I veered from my usual more traditional style.  I made this one colorful.  This is Turkey in Colors and it, too, has been satin-stitched at this point.
I have to rest now.
I find that I can work at my sewing machine about two hours.  After that, I can push myself a little more, but I get an awful aching back when I do.  I find its not worth it.  I have plenty of time to finish a few more Holiday wall hangings before the Holidays.  I want to work on snowmen and penguins once I finish quilting these above.

This evening I'll be back to crocheting another pair of hanging dish towels while I watch TV.

Have a Nice Day.

Sunday, November 5, 2017

Fall Harvest Dish Towels Done

I wanted something that said fall, without being specifically Thanksgiving and found these cute Harvest Pumpkin dish towels.  I made myself the first pair and hung them on my oven door.
I even used my signature honey bee buttons for them.  I really like these.  I will put up the ones with roosters closer to Thanksgiving since I could not find anything with turkeys on them.

Have a good day.

I Sewed Today, Working on WHs

I thought it was time for me to get cracking on T-Day wall hangings.  Today I made inroads.

I finished "Cornucopia" today.  Its small, but perfect for hanging on my front door at 9.5" by 11" so I'm content.   Now I have two T-Day wall hangings finished so I can switch them around each week.

This one is "Turkey Duo" which is larger and its all tacked down but lots more stitching needed before its complete.  The background fabric is chicken wire.

And I've wanted to do something about my beloved pet, Penny.  I'm making a portrait of her as well.   I also love the color turquoise, so the background fits perfectly.  Here it is tacked down at this point.  I will work on it in between T-Day and Xmas projects.

Right now my back is aching.  Sewing does that.  I must sit awkwardly at my machine and bending forward to look closely at my work doesn't help solve the aching problems.  For now I will rest up a bit.  Its a dark and gray day today anyway and the lighting by my machine isn't really bright for close work.  The lamps I have do not do the trick.  So rest and TV and a good book are on my menu this afternoon

Have a good day.

Saturday, November 4, 2017

Tuna Fish for Sandwiches.

I like very little seafood, but canned tuna is one of my favorites for sandwiches.  I don't like chunks of tuna, so I flake mine.  I also only use solid white tuna or albacore.

Ingredients:
1     4 oz.. can Albacore Tuna Fish, water packed, drained in the can
1     Stalk Celery, finely chopped
1/4 to 1/3 of a  Medium -sized Yellow Onion, finely chopped.
2     Tablespoons Mayonnaise (or Salad Dressing, if you prefer)
1-2  teaspoons lemon juice, if desired
Salt and Pepper to taste

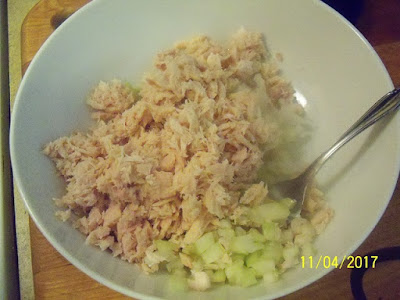
When you open a can of tuna, the solid white and the albacore, are one solid piece, not like above.  I have already started the flaking process on my can of tuna.
I like to flake my tuna.  Chunks are not to my liking.
To flake it, just take the tines of a salad or dinner fork and scrape it over the tuna in the can.  Keep scraping it across the tuna so it flakes.

You keep flaking it until it looks like you want it.


Place your finely chopped onion and celery in a bowl.  Scrape your tuna in the bowl now.
Add your lemon juice if you are using it, plus your salt and pepper to taste.  Mix it all up.

If you want more green, you can add some lettuce or whatever greens you prefer.
Add your mayo and stir to incorporate it all together.
Cover and refrigerate.

I enjoy this spread on toasted white or wheat bread and also on toasted hot dog rolls or stuffed into small sandwich rolls for a party.

Have a Nice Weekend!

Friday, November 3, 2017

Mash Right Potatoes

I am a meat and potatoes gal and one of my favorite type of potato is mashed.  I detest any gluey taters and I don't like lumps and clumps in my potatoes.  These come out right every time.

You will need several peeled Russet potatoes.  They have the right amount of starch to make them smooth and with a perfect texture.

Ingredients:
Russet Potatoes
1 Tablespoon Salt
1/2 C or more of warmed Half and Half (or liquid you desire)  Half and Half and milk combo, a touch of Sour Cream, Cream and Milk combo, the choice is yours.
4-7 Tablespoons Butter, depending on how may potatoes you make. (I use about 4 T. with 4-5 med. to lg. Russets but add more if you really like butter).
Salt and Pepper to taste for flavoring

Slice your taters lengthwise, than cut them at an angle across.

They are sliced to about 1 1/2 to 2 inches in size, or thereabouts.

Rinse and place in a saucepan with 1 Tablespoon salt, with water just covering the tops.

Here are some of the tools you'll need.  Do NOT use an electric mixer, hand or stationery.  It will change the chemistry of the potatoes.  You need to mash them then use a whisk to finish them off.

I found that a sharp paring knife was my best friend.  Stick the point into some of the taters and if it slides in easily to the center and beyond, the taters are done.
Bring taters to a boil, then lower to medium and cook til taters are tender.

Drain your taters in a colander than return them to the same pan.  Its still warm.  If you have an electric stove, your burner will still be hot which is perfect.  Place your pot on it and stir the taters with a wooden spoon so they can dry out, releasing the moisture as much as you can.  Its the moisture in the taters than makes pasty taters.

As the taters dry on the burner, break up the taters with your wooden spoon.  It will make mashing them later, easier.  Just break up the larger pieces.  Keep stirring to release the moisture.

I don't like to mash in my saucepan because I don't want to scratch it, so I use a mixing bowl.  Place the bowl on your burner to warm it a bit before transferring your taters from your pan.  If you mash in your pan, the bowl is not needed.  You mash in the pan as well.

Now you add the butter to your taters.  You also need to add salt and pepper to your taste. 
Think of your bowl as a clock.  At the noon point, start with your masher and press down at every hour going around the 'clock' about 2 or 3 times.  This will assure you of getting rid of the lumps.

When your taters feel lump-free, go to the next step.

Heat your liquid (I like Half and Half best) til warm.  Add to the taters and using a whisk, whisk the taters and liquid together a little at a time.  Add more liquid as you whisk.

When it feels to your liking (some of us like it thinner and smoother and others like it smooth but thicker), you can taste it.

That first spoonful should be smooth and creamy, no lumps, no gluey/pasty taste.  Now is the time to add more salt or pepper if you feel you need it.

Place taters in a serving bowl and serve as is, or with gravy.  Both ways are Greattttt!
Place leftovers in  a covered bowl and refrigerate.  They'll stay nice for a couple of days.  If they feel a bit dry just add a touch of milk and stir it in to make it more creamy.

Have a good day.